
[Tensorflow] 02 Tensorflow로 시작하기
01 TensorFlow로 시작하기
TensorFlow는 구글에서 개발한 기계 학습용 엔진입니다. 현재 머신러닝에 관한 함수를 제공하는 라이브러리가 다수 존재하지만 TensorFlow가 선두를 달리고 있습니다. 따라서 <모두를 위한 딥러닝/머신러닝 강의>에서 역시 TensorFlow를 사용합니다. 
TensorFlow를 설치하는 과정은 여러 게시물에 나와있으니…
윈도우에서 TensorFlow 설치하기 > http://datamasters.kr/11
이전에 이클립스로 안드로이드 코딩을 해본 적이 있던지라 이클립스가 익숙하더라구요. 그래서 저는 이클립스에서 파이썬 코딩을 위한 환경을 마련하였습니다.
이클립스 파이썬 개발환경 만들기 > http://blog.naver.com/sakura_pink?Redirect=Log&logNo=221007702010
02 TensorFlow에 관하여
> 텐서플로우 문서 한글 번역본을 참조하였습니다.
:: https://tensorflowkorea.gitbooks.io/tensorflow-kr/content/g3doc/get_started/basic_usage.html
무작정 일단 강의를 듣기 시작하였지만 강의를 중단하고 TensorFlow를 이해하는 시간을 가져야 한다고 생각하였습니다.
01) 개요
TensorFlow는 Graph를 만든 후 Session에서 실행시키는 구조를 가집니다.
02) Graph(그래프)
Graph는 Node(점)와 Edge(선)로 이루어져 있습니다. Node는 op(작업)와 같은 말입니다.
Node는 0개 이상의 Tensor를 가집니다.
TensorFlow에서의 Tensor는 정형화된 다차원 배열을 나타냅니다. (? 행렬이라는 뜻인가요)
Graph는 단지 연산을 표현해 놓은 것입니다. 실행은 Session 상에서 이루어집니다.
Graph를 만드는 것은 op를 정의하는 것에서부터 시작됩니다.
import tensorflow as tf
# 1x2 행렬을 만드는 constant op을 만들어 봅시다.

# 이 op는 default graph에 Node로 들어갈 것입니다.

matrix1 = tf.constant([[3., 3.]])

# 2x1 행렬을 만드는 constant op을 만들어봅시다.

matrix2 = tf.constant([[2.],[2.]])

# 'matrix1'과 'matrix2를 입력값으로 하는 Matmul op(역자 주: 행렬곱 op)을 만들어 봅시다.

# 이 op의 결과값인 'product'는 행렬곱의 결과를 의미합니다.

product = tf.matmul(matrix1, matrix2)
03) 세션
# default graph를 실행시켜 봅시다.

sess = tf.Session()

# 행렬곱 작업(op)을 실행하기 위해 session의 'run()' 메서드를 호출해서 행렬곱 작업의 결과값인 'product' 값을 넘겨줍시다.

# 그 결과값을 원한다는 뜻입니다.

# 작업에 필요한 모든 입력값들은 자동적으로 session에서 실행되며 보통은 병렬로 처리됩니다.
# ‘run(product)’가 호출되면 op 3개가 실행됩니다. 2개는 상수고 1개는 행렬곱이죠.
# 작업의 결과물은 numpy `ndarray` 오브젝트인 result’ 값으로 나옵니다.
result = sess.run(product)
print(result)
# ==> [[ 12.]]
# 실행을 마치면 Session을 닫읍시다.
sess.close()
아래와 같이 표현할 수도 있다고 합니다.
with tf.Session() as sess:

result = sess.run([product])

print(result)
* 만약 컴퓨터에 다수의 Device가 있다면 명시적으로 이를 지정해줄 수도 있다고 합니다.
저는 only CPU 이므로… pass…
with tf.Session() as sess:

   with tf.device("/gpu:1"):
matrix1 = tf.constant([[3., 3.]])

matrix2 = tf.constant([[2.],[2.]])

product = tf.matmul(matrix1, matrix2)

...
"/cpu:0": 컴퓨터의 CPU. "/gpu:0": 컴퓨터의 1번째 GPU. "/gpu:1": 컴퓨터의 2번쨰 GPU.
04) Tensor
계속해서 Tensor에 관한 항목을 알아봅시다. TensorFlow에서 Tensor는 n차원의 배열(2차원 배열 = 행렬)이나 리스트로 표현됩니다. 또한 프로그램 내에서 모든 데이터는 Tensor의 형태로 이동합니다.
각각의 Tensor는 Rank(차원, order, degree, -n_dimension), Shape(형태), Data type(타입)을 가집니다.
(1) Rank
아래 Tensor t의 Rank는 2입니다. []가 두쌍이기 때문이라고 생각하면 쉽습니다.
t = [[1, 2, 3], [4, 5, 6], [7, 8, 9]]
Rank가 2인 Tensor는 행렬, Rank가 1인 Tensor는 벡터로 생각할 수 있다고 합니다.
| Rank | Math entity | Python example |
|---|---|---|
| 0 | Scalar (magnitude only) | s = 483 |
| 1 | Vector (magnitude and direction) | v = [1.1, 2.2, 3.3] |
| 2 | Matrix (table of numbers) | m = [[1, 2, 3], [4, 5, 6], [7, 8, 9]] |
* Tensor의 원소 지정/접근
– Rank=2인 Tensor:: t[i, j]
– Rank=3인 tensor는 t[i, j, k]
(2) Shape
TensorFlow는 Tensor의 차원을 표현하는 데에 3가지 방식을 사용합니다.
| Rank | Shape | Dimension number |
|---|---|---|
| 0 | [] | 0-D |
| 1 | [D0] | 1-D |
| 2 | [D0, D1] | 2-D |
| 3 | [D0, D1, D2] | 3-D |
| n | [D0, D1, … Dn-1] | n-D |
(3) Data type
DT_FLOAT |
tf.float32 |
32 비트 부동 소수. |
DT_INT32 |
tf.int32 |
32 비트 부호 있는 정수. |
이 둘만 알면 될 것 같습니다.
05) Variable(변수)
모델 학습을 위해 Parameter(매개변수)를 사용할 때 쓰이는 것이 변수입니다. (?)
변수는 반드시 명시적으로 초기화되어야 하며 학습 중 혹은 후에 디스크에 저장될 수 있습니다. (?)
아래의 예시를 보며 기본적인 개념을 익혀보겠습니다.
# 값이 0인 스칼라로 초기화된 변수 state를 만듭니다.

state = tf.Variable(0, name="counter")

# 'state'에 1을 더하는 작업(op)을 만듭니다.

one = tf.constant(1)  // one은 session 상에서 상수 1을 만들겠군요.

add_number = tf.add(state, one)  // add_number는 session 상에서 state에 one을 더합니다.

update = tf.assign(state, add_number)  // assign 함수 설명은 아래에서...

# 변수는 반드시 명시적으로 초기화해야합니다.

# 먼저 'init' 작업(op)을 추가해 봅시다.

init_op = tf.global_variables_initializer()

# graph와 작업(op)들을 실행시킵니다.

with tf.Session() as sess:

   # 'init' 작업(op)을 실행합니다.

   sess.run(init_op)

   # 'state'의 시작값을 출력합니다.

   print(sess.run(state))

   # 'state'값을 업데이트하고 출력하는 작업(op)을 실행합니다.

   for _ in range(3):  // 아래의 작업을 3번 실행합니다.

sess.run(update)

print(sess.run(state))

# output:

# 0

# 1

# 2

# 3
기본적인 개념은 잡혔으니 계속해서 변수에 대해 알아보겠습니다.
변수는 tf.Variable()를 통해 Graph에 추가며 run()의 호출로 상태를 유지합니다.
Variable() 생성자는 변수의 초기값으로 Tensor의 type과 shape를 받아 변수의 type과 shape를 정의합니다.
생성 후, 변수의 type과 shape은 고정되며 변수의 값은 assign 메소드를 사용해 변경할 수 있습니다.
후에 변수의 shape를 변경하고 싶다면 assign에서 validate_shape=False로 해야합니다. (?)
Tensor의 경우, Variable()로 만들어진 변수는 graph의 ops의 input으로 사용될 수 있습니다. 추가적으로, Tensor 클래스로 오버로드 되는 모든 연산(operators)은 변수로 넘겨집니다. 그래서 변수의 산술연산만으로도 graph에 노드를 추가할 수 있습니다. 무슨 말인지 모르겠으니 작게 표시합니다…아래를 보면 조금은 이해 갈 수도
import tensorflow as tf

# 변수를 만듭니다. 초기값을 넘겨주어야 한다.

w = tf.Variable(<initial-value>, name=<optional-name>)

# 변수는 다른 Tensor와 마찬가지로 사용될 수 있습니다.

y = tf.matmul(w, ...another variable or tensor...)

# 오버로딩된 연산자들 역시 사용가능합니다. (?)

z = tf.sigmoid(w + y)

# 변수의 새로운 값 삽입은 assign() 혹은 그와 관련된 함수로 가능합니다.

w.assign(w + 1.0)

w.assign_add(1.0)
* 요약:: 변수의 생성 tf.Variable(<initial-value>, name=<optional-name>)
weights = tf.Variable(tf.random_normal([784, 200], stddev=0.35), name="weights")

biases = tf.Variable(tf.zeros([200]), name="biases")
변수를 만들때는 Variable()에 초기값을 넘겨주어야 합니다.
Variable()를 통해 Tensor를 변수에 저장합니다.
위에서는 2가지 방법으로 초기값을 주었습니다.
① tf.zeros(shape, dtype=tf.float32, name=None)
: 모든 원소의 값이 0인 텐서를 생성합니다.
: 이 연산은 모든 원소의 값이 0이고, shape shape을 가진 dtype타입의 텐서를 반환합니다.
** 예시:
tf.zeros([3, 4], int32) ==> [[0, 0, 0, 0], [0, 0, 0, 0], [0, 0, 0, 0]]
– shape: 정수 리스트 또는 int32타입의 1-D(1-Dimension) Tensor.
– dtype: 반환되는 Tensor의 원소 타입.
– name: 연산의 명칭 (선택사항).
** 반환값:
– 모든 원소의 값이 0인 Tensor.
② tf.random_normal(shape, mean=0.0, stddev=1.0, dtype=tf.float32, seed=None, name=None)
: 정규분포로부터의 난수값을 반환합니다.
** 예시:
weights = tf.Variable(tf.random_normal([784, 200], stddev=0.35), name="weights")
==> wieghts가 784 x 200 matrix로 생성됩니다.
** 인자:
– shape: 정수값의 1-D 텐서 또는 파이썬 배열. 반환값 텐서의 shape입니다.
– mean: 0-D 텐서 또는 dtype타입의 파이썬 값. 정규분포의 평균값.
– stddev: 0-D 텐서 또는 dtype타입의 파이썬 값. 정규분포의 표준 편차.
– dtype: 반환값의 타입.
– seed: 파이썬 정수. 분포의 난수 시드값을 생성하는데에 사용됩니다. 동작 방식은 set_random_seed를 보십시오.
– name: 연산의 명칭 (선택사항).
** 반환값:
– 정규 난수값들로 채워진 shape으로 정해진 텐서.
아래 내용을 찬찬히 읽어보는 걸로…
ref:: https://stackoverflow.com/questions/35094899/tensorflow-operator-overloading
|
If at least one of Note that if neither The following operators are overloaded in the TensorFlow Python API:
|
변수의 초기화는 대개 initializer op를 통해 이루어집니다.
with tf.Session() as sess:

   # 변수를 초기화합니다.

   sess.run(w.initializer)

   # 변수 w를 사용할 수 있습니다.
사실 더 일반적인 것은 graph를 구성할 때 변수 초기화 op를 지정하는 것입니다.
# 변수 초기화 op를 만듭니다. 이전과 달리 '모든' 변수를 초기화합니다.

init_op = tf.initialize_all_variables()

with tf.Session() as sess:

   # 변수 초기화 op를 실행합니다.

   sess.run(init_op)

   # 모든 변수가 초기화되었습니다. 변수를 사용하는 모든 op를 실행 가능합니다.
* 순서대로 변수 초기화할 필요가 있는 경우에는 다른 변수의 initialized_value()를 사용합니다.
# 랜덤 값으로 새로운 변수 초기화

weights = tf.Variable(tf.random_normal([784, 200], stddev=0.35), name="weights")

# weights와 같은 값으로 다른 변수 초기화

w2 = tf.Variable(weights.initialized_value(), name="w2")

# weights의 2배 값으로 다른 변수 초기화

w_twice = tf.Variable(weights.initialized_value() * 2.0, name="w_twice")
* tf.Variable.assign(value, use_locking=False)에 관하여
Assigns a new value to the variable. This is essentially a shortcut for assign(self, value).
Args:
value: A Tensor. The new value for this variable.
use_locking: If True, use locking during the assignment.
Returns:
Tensor that will hold the new value of this variable after the assignment has completed.
06) Fetch (가지고 오다)
작업의 결과를 가져오기 위해 Session 오브젝트에서 run()을 호출해서 graph를 실행하고 tensor로 결과값을 끌어냅니다. 앞의 예제에서는 ‘state’ 하나의 노드만 가져왔지만 복수의 tensor를 받아올 수도 있습니다.
input1 = tf.constant([3.0])

input2 = tf.constant([2.0])

input3 = tf.constant([5.0])

intermed = tf.add(input2, input3)

mul = tf.multiply(input1, intermed)

with tf.Session() as sess:

result = sess.run([mul, intermed])

print(result)

# output:

# [array([ 21.], dtype=float32), array([ 7.], dtype=float32)]
여러 tensor들의 값을 계산해내기 위해 수행되는 작업(op)들은 각 tensor 별로 각각 수행 되는 것이 아니라 전체적으로 한 번만 수행됩니다.
07) Feed
위의 예제에서 살펴본 graph에서 tensor들은 상수(Constant) 와 변수(Variable)로 저장되었습니다. TensorFlow에서는 graph의 연산에게 직접 tensor 값을 줄 수 있는 ‘feed 메커니즘’도 제공합니다.
feed 값은 일시적으로 연산의 출력값을 입력한 tensor 값으로 대체합니다. feed 데이터는 run()으로 전달되어서 run()의 변수로만 사용됩니다. 가장 일반적인 사용방법은 tf.placeholder()를 사용해서 특정 작업(op)을 “feed” 작업으로 지정해 주는 것입니다.
#두개의 input을 placeholder로 지정합니다.
input1 = tf.placeholder(tf.float32)

input2 = tf.placeholder(tf.float32)

output = input1 * input2

with tf.Session() as sess:

# session을 실행하면서 feed를 통해 input1과 input2에 값을 지정해줍니다.

print(sess.run([output], feed_dict={input1:[7.], input2:[2.]}))

# output:

# [array([ 14.], dtype=float32)]
만약 feed 를 제대로 제공하지 않으면 placeholder() 연산은 에러를 출력할 것입니다.
마지막 최종 정리
placeholder()의 개념까지 곁들여 TensorFlow의 개념을 요약해보도록 하겠습니다.
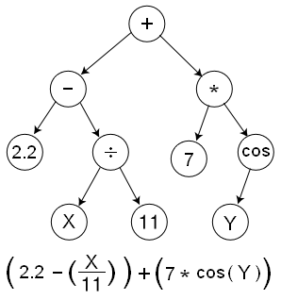
위 Tree에서 각각의 동그라미들(node)은 모두 op라고 할 수 있습니다. 2.2, 7 등은 상수일 것이고 +, -, cos 등은 연산을 처리하기 위한 op이겠네요. X, Y는 현재 아무런 값이 지정되어 있지 않으니 placeholder라고 할 수 있겠습니다.
이 Tree는 이 상태로는 아무것도 하지 못합니다. Session 상에서 실행될 때에만 아래의 식이 계산되어집니다. TensorFlow 상에서 op 간에 이동하는 데이터를 모두 Tensor라고 부릅니다.
참조
♦ https://stackoverflow.com/questions/35094899/tensorflow-operator-overloading
♦ https://tensorflowkorea.gitbooks.io/tensorflow-kr/content/g3doc/get_started/basic_usage.html
♦ http://daeson.tistory.com/entry/6-Tensorflow-%EC%8B%9C%EC%9E%91%ED%95%98%EA%B8%B0-%EB%B3%80%EC%88%98